Although the current HDMI standard (HDMI 1.4) actually supports displays with very high resolutions, you’ll face display or graphics card problems. E.g., driver and hardware (single link HDMI) of the integrated Intel HD Graphics 3000 and 4000 restrict the resolution to 1920×1200 at 60 Hz and you’ll need a trick to use higher resolutions. In addition, many 27-inch and 30-inch displays, e.g., Fujitsu’s P27T-6 or Dell displays (e.g. U2711 or 2713HM) only report a maximum resolution of 1920×1200 via HDMI.
The following article will briefly summarize our experiences and serve as a quick guide.
By the way, we did not use a special cable. Unless specifically noted, we used an ordinary, cheap HDMI cable.
Intel Iris Pro 5200 (Haswell) / new Intel driver interface
Status: successful, 2560×1440 55 Hz with Fujitsu P27T-6 tested
Tested with Schenker S413 (Clevo W740SU) , Windows 8 and Intel driver 3345
Instructions
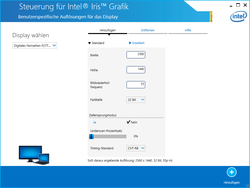
The newer Intel drivers (introduced with Windows 8) offer a new user interface that lacks the option to add a custom resolution. However, Intel bundles a tool called “CustomModeApp” with the driver that offers the possibilty to add a custom resolution. You can call it in using the Windows 8 search (by just searching for “CustomModeApp” for example). In our tests 2560 x 1440, 55 Hz, 32 Bit, CVT-RB was successfull. However, one reader mentioned that only 50 Hz was accepted with his system.
In theory this method should work with all newser Intel graphics cards that use the new driver user interface (e.g. Intel HD Graphics 4000, HD Graphics 4200, HD Graphics 4400, HD Graphics 4600, Iris 5000, …). On how to add a custom resolution with the older drivers, see the next abstract.
Instructions
You need to manually add a new resolution to the Intel driver (Display -> Custom Resolutions) to use a resolution of 2560×1440 via HDMI. The driver complains that the bandwidth via HDMI is too low for a resolution of 2560×1440 at 60 Hz. With the “GTF” timing setting, only a maximum of 30 Hz was possible in our test. However, if you select “CVT-RB” (Reduced Blank) as Timing Standard, 2560×1440 at 55 Hz (55 p) is possible. But, it did not appear in the Windows dialog until we rebooted the computer. If it is still not listed after the first reboot, repeat the procedure.
If the image is distorted or flickers heavily, it might help to fiddle around with the monitor settings. E.g. the Fujitsu P27-T just stopped flickering in “Office” mode.
Linux (Ubuntu)
With the system tool of Linux only a maximum of 2560×1440 at 30 Hz (with noticeable delays) was possible. But, by means of a working windows configuration and PowerStrip you can also configure 2560×1440 at 55 Hz (with reduced blanking). Unfortunately, you can only specify modelines a multiple of 60 MHz at “reduced blanking” directly in the CVT tool.
2560×1440 30 Hz instructions:
The command
cvt 2560 1440 30
creates the appropriate modeline for xrandr, e.g. modeline “2560x1440_30.00” 146.25 2560 2680 2944 3328 1440 1443 1448 1468 -hsync +vsync
and you can add a new resolution with
xrandr –newmode “2560x1440_30.00” 146.25 2560 2680 2944 3328 1440 1443 1448 1468 -hsync +vsync
and one for HDMI2 with (for the name of the interface use xrandr without parameters)
xrandr –addmode HDMI2 “2560x1440_30.00”
Source: Linus Torvalds on Google+
2560×1440 55 Hz with reduced blanking
2560×1440 at 55 Hz: Thanks to X.Org FAQ we found a further solution. PowerStrip can display the currently used Linux modeline parameter. So, we could figure out the 55 MHz parameter that works with the P27T-6
xrandr –newmode “2560×1440” 220.812 2560 2608 2640 2720 1440 1443 1448 1478 -hsync -vsync
and activate it as usual with
xrandr –addmode HDMI2 “2560×1440”
Intel HD Graphics 3000 or Intel HD Graphics (Sandy Bridge)
Status: successful, 2560×1440 55Hz tested
Tested with: Acer Aspire TimelineU M3-581TG and Fujitsu P27T-6 27-inch display with 2560×1440.
Tested with: Intel Whitebook with Pentium B950 (HD Graphics) and Fujitsu P27T-6 27 inch display with 2560×1440.
Instructions
Same steps as for Intel HD Graphics 4000 (see above).
AMD HD Graphics 7660G (Trinity)
Status: not successful
Tested with: AMD Trinity test device (based on a modified Dell Vostro)
Instructions
Although we successfully added a Custom Resolution with “regedit” (adding 1366×768 worked this way), 2560×1440 (we tried: 30, 40, 55, 60 Hz) could not be selected in the Windows Dialog.
Source: Steam forum instruction
– First go to AMD catalyst and look under Information, then Software.
– Look for the 2D Driver Path. Make a note of the Path as you’ll need it later.
– Go to start menu search for RegEdit
– Open RegEdit as Administrator (You must open as admin otherwise RegEdit will not save changes).
– Open the folder as described in the 2D driver path.
– Look for a registry file in that folder called DALNonStandardModesBCD2 click Modify then add your chosen custom resolution to the list (mine was for 1440×900 14 40 09 00 00 00 00 60 – the last two digits denote refresh rate).
– Exit RegEdit
– Reboot
– Check Windows display and Catalyst Control to see your new resolution.
Nvidia GeForce graphics card with Optimus
Status: successful, 2560×1440 55 Hz tested
Instructions
The two notebooks are equipped with HD Graphics 3000 or 4000 graphics cards and use Nvidia Optimus for automatically switching between the graphics solutions. You simply need to follow the instructions above since the HDMI port is connected to the Intel HD Graphics in Optimus notebooks.
Nvidia GeForce graphics card without Optimus
Status: successful, 2560×1440 60Hz tested
Tested with: Asus UL50VF (despite with Optimus, the HDMI port is directly connected to the GeForce G210M), driver: 313.96 and Fujitsu P27T-6 27-inch monitor with 2560×1440.
Instructions
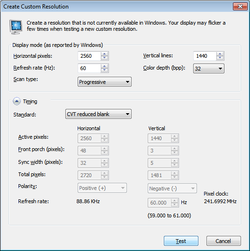
In the Nvidia driver settings, add a new resolution with “Display -> Change resolution, Customize …, Create Custom Resolution”. In our test, a resolution of 2560×1440, 60 Hz, Progressive with Timing “CVT reduced blank” worked without image problems (automatic results in image errors and flickering on the Fujitsu P27T-6). Afterwards you can select the resolution in the Nvidia Control Panel under “Change Resolution”.
A forum user apparently connected a Dell 2713HM to his Sony VPCZ1 with GeForce 330M:
First of all I updated the GeForce drivers using the hacked drivers from:
forum.notebookreview.com/sony/342947-my-discoveries-vaio-z-s-hybrid-graphics-252.htmlThis may put other people off but there has been a lot of work put into these by several people at notebookreview.com.
Then right click the desktop and choose Nvidia Control Panel.
Choose Change screen resolution from right hand menu.
Make sure Dell U2713HM is selected on the left panel.
Choose Customize…
Create Custom Resolution…
Change Horizontal to 2560
Change Vertical to 1440
Refresh rate 40 (highest that would work in my testing)
Color depth 32
Scan type progressive
Expand Timing menu
Choose CVT reduced blank
Choose test


