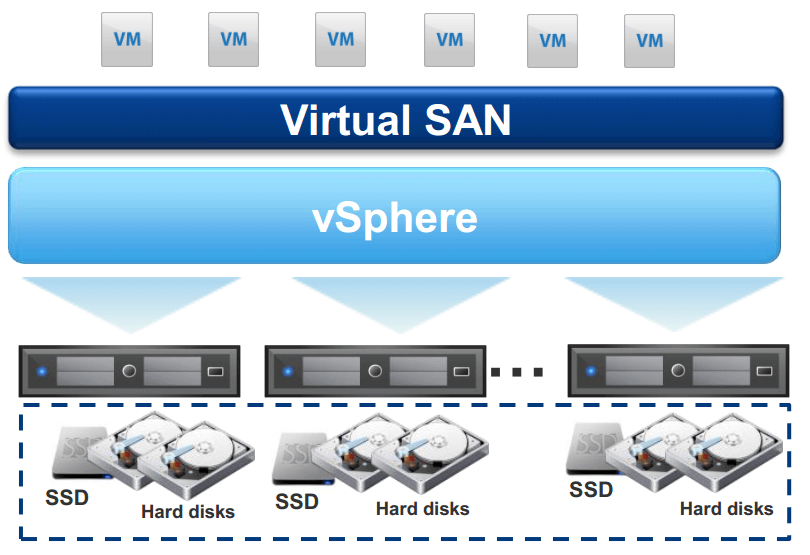
As Microsoft, VMware has a Software-Defined Storage solution called vSAN which is currently in version 6.2. This solution enables to aggregate local device storages as mechanical disks or SSD and create a highly available datastore. There are two deployment models: hybrid solution and full-flash solution.
In hybrid solution, you must have flash cache devices and mechanical cache devices (SAS or SATA). In full-flash solution you have only flash devices for cache and capacity. The disks either flash or capacity will be aggregated in disk groups. In each disk group, you can have 1 cache device and 7 capacity devices. Moreover, each host can handle 5 disk groups at maximum (35 capacity devices per host).
In this topic I will describe how to implement a hybrid solution in a three-nodes cluster. For the demonstration, ESXi nodes are located in virtual machines hosted by VMware Workstation. Unfortunately, Hyper-V under Windows Server 2016 handle not very well ESXi. Only IDE controllers and legacy network adapters are supported. So I can’t use my Storage Spaces Direct lab to host a vSAN cluster ?.
VMware vSAN lab overview
To run this lab, I have installed VMware Workstation 12.x pro on a traditional machine (gaming computer) running with Windows 10 version 1607. Each ESXi virtual machine is configured as below:
- ESXi 6.0 update 2
- 2x CPU with 2x Cores each
- 16GB of memories (6GB required and more than 8GB recommended)
- 1x OS disk (40GB)
- 15x hard disks (10GB each)
Then I have deployed the vCenter server 6.0 update 2 in a single Windows Server 2012 R2 virtual machine.
I have deployed the following networks:
- Management: 10.10.0.0/24 (VLAN ID: 10) – Native VLAN
- vSAN traffic: 10.10.101.0/24 (VLAN ID: 12)
- vMotion traffic: 10.10.102.0/24 (VLAN ID: 13)

In this topic, I assume that you have already installed your ESXi and vCenter server. I assume also that each server is reachable on the network and that you have created at least one datacenter in the inventory. All the screenshots have been taken from the vSphere Web Client.
Add ESXi host to the inventory
First of all, connect to your vSphere Web Client and navigate to Hosts and Clusters. As you can see in the following screenshot, I have already created several datacenters and folders. To add the host to the inventory, right click on a folder and select Add Host.

Next specify the host name or IP address of the ESXi node.

Then specify the credential to connect to the host. Once the connection is made, a permanent account is created and used for management and not anymore the specified account.

Then select the license to assign the the ESXi node.

On the next screen, choose if you want to prevent a user to logging directly into this host or not.

To finish, choose the VM location.

Repeat these steps to add more ESXi node to inventory. For the vSAN usage, I will add two additional nodes.
Create and configure the distributed switch
When you buy a vSAN license, a single distributed switch support is included. To support the vSAN, vMotion and management traffic, I’m going to create a distributed switch with three VMKernels. To create the distributed switch, navigate to Networking and right click on VM Network in a datacenter and choose New Distributed Switch as below.

Specify a distributed switch name and click on Next.

Choose a distributed switch version. Because I have only ESXi version 6.0, I choose the last version of the distributed switch.

Next change the number of uplinks as needed and specify the name of the port group. This port group will contain VMKernel adapters for vMotion, vSAN and management traffic.

Once the distributed switch is created, click on it and navigate to Manage and Topology. Click on the button encircled in red in the below screenshot to add physical NICs to uplink port group and to create VMKernel adapters.

In the first screen of the wizard, select Add hosts.

Specify each host name and click on Next.

Leave the default selection and click on Next. By selecting the following tasks to perform, I’ll add physical adapters to uplink port group and I’ll create VMKernel adapters.

In the next screen, assign the physical adapter (vmnic0) to the uplink port group of the distributed switch which has just been created. Once you have assigned all physical adapters, click on Next.

On the next screen, I’ll create the VMKernel adapters. To create them, just click on New adapter.

Select the port group associated to the distributed switch and click on Next.

Then select the purpose of the VMKernel adapter. For this one I choose Virtual SAN traffic.

Then specify an IP address for this virtual adapter. Click on Next to finish the creation of VMKernel adapter.

I create again a new VMKernel adapter for vMotion traffic.

Repeat the creation of VMKernel adapters for each ESXi host. At the end, you should have something like below:

Before make the configuration, the wizard analyzes the impact. Once all is ok, click on Next.

When the distributed switch is configured, it looks like that:

Create the cluster
Now the distributed switch and virtual network adapters are set, we can create the cluster. Come back to Hosts and Clusters in the navigator. Right click on your folder and select New Cluster.

Give a name to your cluster and for the moment, just turn on virtual SAN. I choose a manual disk claiming because I have set to manually which disks are flash and which disks are HDD. This is because ESXi nodes are in VMs and hard disks are detected all in flash.

Next, move the node in the cluster (drag and drop). Once all nodes are in the cluster, you should have an alert saying that there is no capacity. This is because we have selected manual claiming and no disk are for the moment suitable for vSAN.

Claim storage devices into vSAN
To claim a disk, select the cluster where vSAN is enabled and navigate to Disk Management. Click on the button encircled in red in the below screenshot:

As you saw in the below screenshot, all the disks are marked in flash. In this topic I want to implement a hybrid solution. vSphere Web Client offers the opportunity to mark manually a disk as HDD. This is possible because in production, some hardware are not well detected. In this case, you can set it manually. For this lab, I leave three disks in flash and I set 12 disks as HDD for each node. With this configuration, I will create three disk groups composing of one cache device and four capacity device.

Then you have to claim disks. For each node, select the three flash disks and claim them for cache tier. All disks that you have marked as HDD can be claimed for capacity tier.

Once the claiming wizard is finished, you should have three disk groups per node.

If you want to assign the license to your vSAN, navigate to Licensing and select the license.

Final configuration
Now that vSAN is enabled, you can Turn On vSphare HA and vSphere DRS to distribute virtual machines across the nodes.


Some vSphere HA settings must be changed in vSAN environment. You can read these recommendations in this post.
VM Storage policy
vSAN is based on VM Storage policy to configure the storage capacity. This configuration is applied by VM per VM basis with the VM Storage policy. We will discuss about VM Storage policy in another topic. But for the moment, just verify that the Virtual SAN Default Storage policy exists in the VM Storage Policies store.

Conclusion
In this topic we have seen how to create a vSAN cluster. There is no challenge in this but it is just the beginning. To use the vSAN you have to create VM Storage Policy and some of the capacity concept are not easy. We will discuss later about VM Storage policy. If you are interested by the same Microsoft solution, you can read this whitepaper.